How to 3D Scan Anything With Just Your iPhone (No LiDAR Required)
Most "iPhone 3D scanning" articles assume you have a Pro model with LiDAR. You don't need one. Any iPhone made since 2018 can produce production-quality 3D models — and for small to medium objects, photogrammetry from a regular iPhone often beats what LiDAR delivers.
This is a step-by-step guide to capturing a usable 3D scan with the phone already in your pocket and processing it on your Mac with Replica.
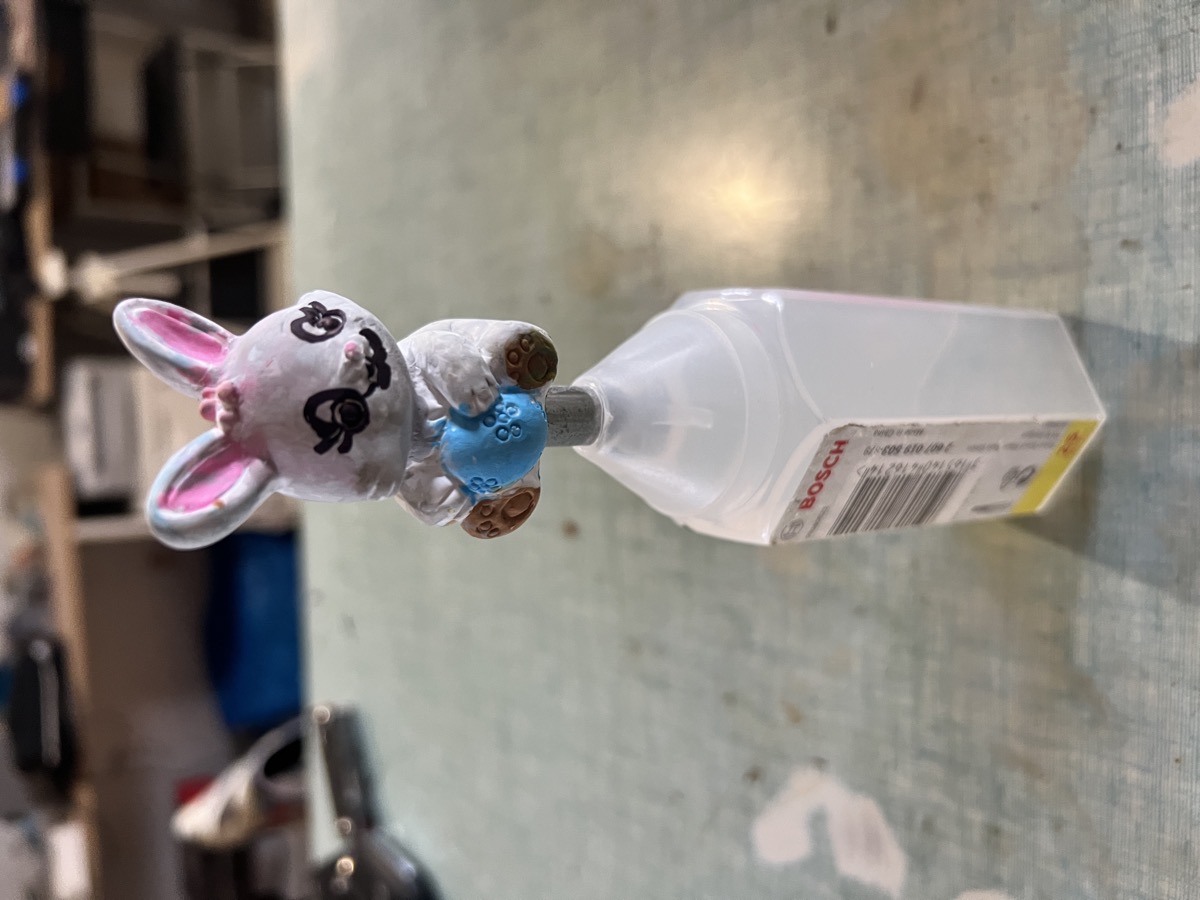 A handheld scan of a small ceramic figure. No LiDAR was used — only photographs and photogrammetry.
Why Your Regular iPhone Is Enough
LiDAR is great for rooms, buildings, and large surfaces — anything where dimensional accuracy at medium range matters more than fine detail. For small and medium objects, the picture flips. Photogrammetry generates point clouds on a pixel basis, which means it captures finer geometry and richer textures than the depth maps an iPhone LiDAR sensor produces.
A few facts worth knowing before you start:
- LiDAR is only on Pro iPhones (12 Pro through 17 Pro). Standard, Plus, and base models don't have it.
- The iPhone LiDAR sensor has an effective range of about 5 meters, with linear accuracy of 1–2 cm in static captures.
- For complex surfaces and small details, photogrammetry "still outperforms LiDAR scanning in terms of alignment, mesh quality, and capturing small details" — that's the conclusion from peer-reviewed studies, not a marketing claim.
If you're scanning a person, a sculpture, a product, or anything small enough to walk around, photos are the better data source. LiDAR shines for room-scale work and exterior facades, not handheld product shots.
What You'll Need
- An iPhone with a working camera (anything from the iPhone XS / 2018 onwards)
- A Mac running macOS 12 or later (Apple Silicon strongly recommended)
- Replica installed on the Mac — download here
- About 10 minutes for a small object, or 20–30 minutes for a complex one
- An object you can walk around freely
You don't need a turntable, a lightbox, or a tripod. You also don't need a third-party scanning app — Replica processes raw photos directly.
Step-by-Step Capture
1. Set Up the Object
Place the object in soft, even light. The single biggest cause of bad photogrammetry scans is hard shadows. A semi-cloudy day outdoors is ideal. Indoors, position the object near a window with diffused light, or use a couple of soft LED panels.
Avoid direct sunlight. Harsh shadows confuse the reconstruction algorithm and bake darkness permanently into your textures.
The background should be visually different from the object. Plain matte surfaces work well; glossy or reflective backgrounds cause floating artefacts.
2. Lock Your Camera Settings
Open the iPhone camera app. Tap and hold on the object to lock AE/AF Lock (auto-exposure and auto-focus). This prevents the camera from re-adjusting between shots, which is critical — inconsistent exposure makes the reconstruction less accurate.
If you have an iPhone Pro, switch to the 48 MP setting (Settings → Camera → Formats → ProRAW & Resolution Control). More resolution helps, though "experts recommend cameras with at least 20 megapixels for effective photogrammetry" — every iPhone since the XS comfortably exceeds that.
3. Capture in Three Concentric Rings
This is the technique that produces clean, gap-free models:
- Lower ring: walk around the object, holding the phone slightly above the table, pointing slightly downward. Take 20–30 photos.
- Middle ring: walk around again at the object's eye level, phone level. Another 20–30 photos.
- Upper ring: hold the phone above the object, pointing down. Another 15–20 photos.
Aim for 60–80% overlap between consecutive shots. Each photo should share roughly three-quarters of its frame with the previous one. Total: 55–80 photos for a small object, more for a larger one.
"The first time I tried this with an iPhone 13 — not a Pro — I shot 72 photos of a small ceramic Easter bunny in maybe four minutes. The reconstruction in Replica came out cleaner than my LiDAR test of the same object." — Ennio Pirolo, CEO Ambiens
4. Cover Every Surface
The rule that matters most: every part of the surface must appear in at least three photos. If a surface is visible in only one or two shots, the reconstruction algorithm has nothing to triangulate from, and you'll get holes.
Pay special attention to:
- The top of the object (often forgotten)
- Concave areas under handles, ears, or overhangs
- Edges and corners where surfaces meet
Take more photos than you think you need. Storage is cheap; reshoots are not.
Process the Photos in Replica
Transfer the photos to your Mac (AirDrop is fastest) into a single folder.
- Open Replica and click the
+button in the project sidebar - Select your photo folder
- Click your project, then the Play button to open session configuration
- For your first scan, choose the Balanced preset and enable Object Masking (it isolates the subject from the background)
- Click Start Session
A 60-photo scan on an Apple Silicon Mac typically takes 5–15 minutes at Balanced quality. Replica processes everything locally — your photos never leave your machine.
When it finishes, your model appears in the Viewer. Replica auto-exports a USDZ for AR Quick Look. For OBJ, FBX, or GLB export, see the getting started guide.
Tips That Make or Break the Scan
- Don't move the object mid-capture. If you reposition it, you've effectively started a new dataset.
- Avoid transparent or highly reflective surfaces — glass, polished metal, water. These break photogrammetry. A coat of dry shampoo or matte spray fixes it for one session.
- Keep the object filling 60–70% of the frame. Too small and you waste resolution; too large and you can't capture the silhouette cleanly.
- Don't zoom. Walking closer is always better than digital zoom.
- Fixed focal length wins. If you have a Pro iPhone, stick with the main 1× lens for the whole capture. Mixing focal lengths complicates calibration.
When LiDAR Actually Helps
To be fair: LiDAR is genuinely better for some jobs.
| Scenario | Best tool |
|---|---|
| Small to medium objects (under 1m) | Photogrammetry |
| Detailed textures, fine geometry | Photogrammetry |
| Reflective or low-texture surfaces | Photogrammetry (with matte spray) |
| Whole rooms, interiors | LiDAR |
| Building facades, large structures | LiDAR or drone photogrammetry |
| Speed over fidelity | LiDAR |
If you've got a Pro iPhone and you're scanning a room, the LiDAR-based apps win. For everything else this guide covers, your camera is the better sensor.
Free Dataset to Practice With
Don't have an object to scan yet? You can practice the Replica workflow with a real photogrammetry dataset captured the same way described above:
- Easter Bunnies dataset — small ceramic figure, ideal for first scans
- Appian Tomb dataset — outdoor architectural element, larger scale
Drop the photos into Replica and follow the steps above — the result is a complete loop you can study before shooting your own.
Where to Go From Here
Once your first scan looks right, the natural next steps are exporting it for 3D printing or putting it on the web. Both are covered in:
- From Photos to 3D Print: Two Workflows with Replica
- Replica Link: Your Mac Is Now a Photogrammetry Server — for sending photos from any device on your network
Download Replica and try it with whatever object is on your desk right now. The free version processes up to 50 images per project, which is enough for most small scans.
Questions? Email us at info@ambiensvr.com.