Replica Link
Replica Link transforms your Mac into a photogrammetry server accessible from any device on your local network. Upload photos, launch computations, and view 3D models directly from your phone, tablet, or any browser — without touching the Mac.
Replica Link is available exclusively in Replica Pro.
Getting Started
Requirements
- Replica Pro installed on your Mac
- Both the Mac and the connecting device must be on the same local network (Wi-Fi or Ethernet)
- No internet connection required
Quick Start
- Open Replica Pro on your Mac
- Click the Link button in the toolbar (antenna icon)
- Click Start Link Server
- Choose a folder for uploaded projects (first time only)
- Scan the QR code with your phone — done!

The Link Panel
The Link panel is your control center for Replica Link on the Mac. You can open it by clicking the antenna icon in the toolbar.
When the Server Is Off
The panel shows a description and a single button: Start Link Server. When pressed for the first time, Replica asks you to choose a folder where projects uploaded from remote devices will be saved.
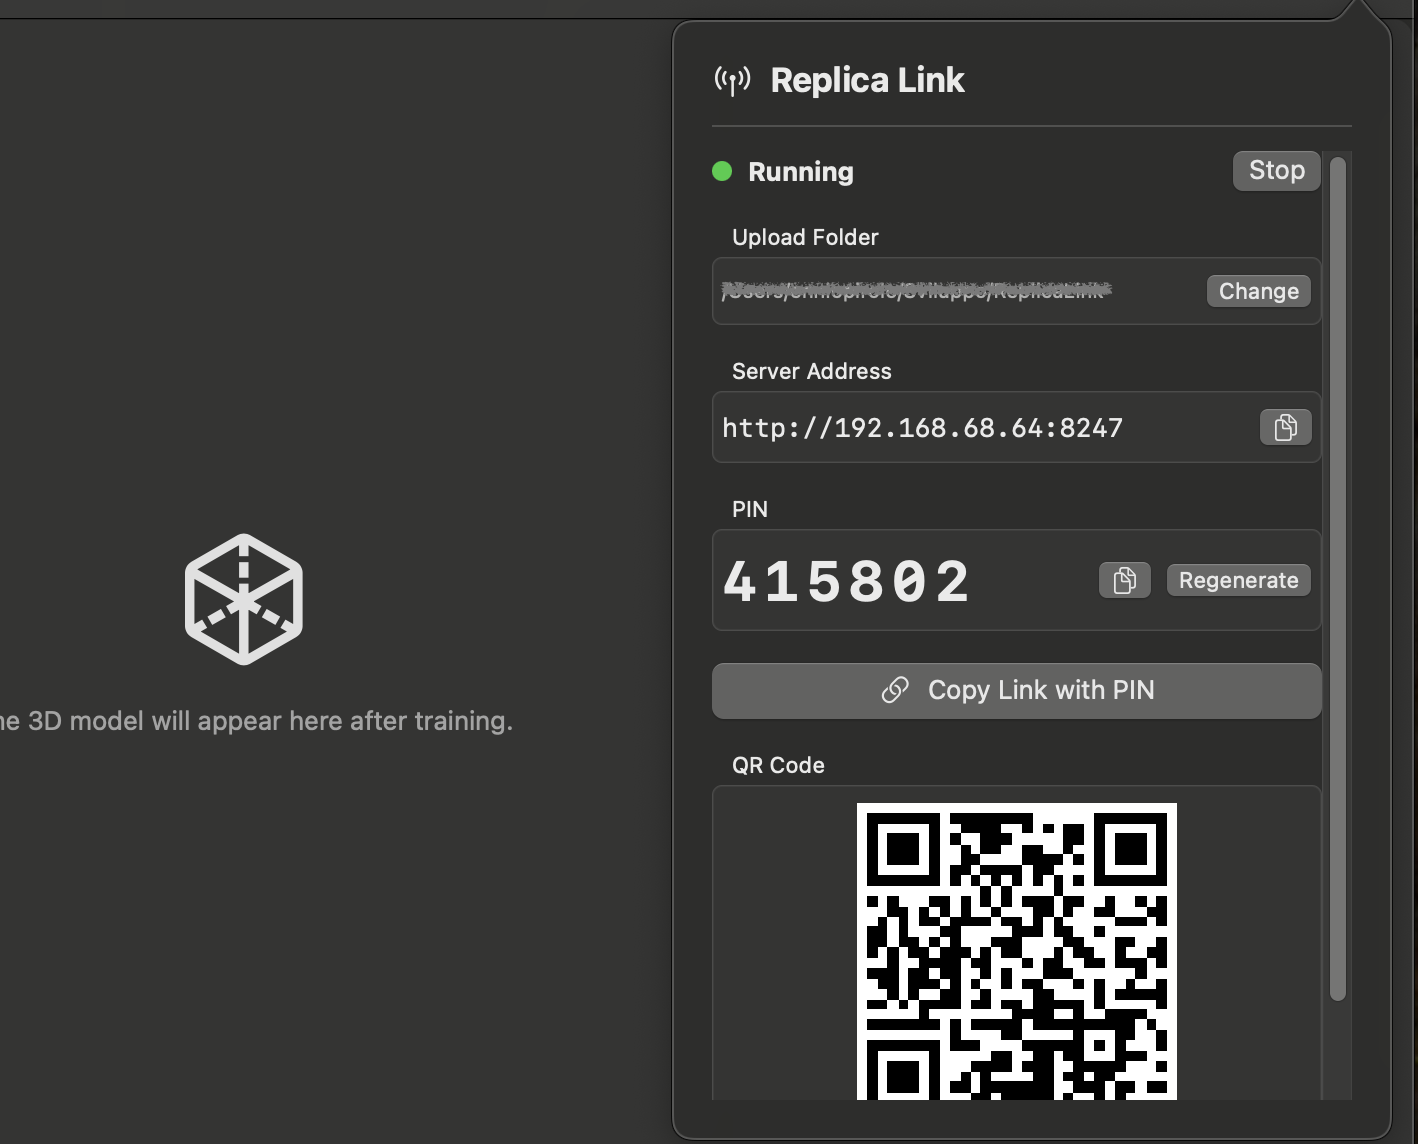
When the Server Is Running
The panel displays:
| Element | Description |
|---|---|
| Status indicator | Green dot when running |
| Upload Folder | The folder where uploaded projects are saved. Click Change to select a different folder |
| Server Address | The local network address (e.g. http://192.168.1.45:8247). Click the copy button to copy it to the clipboard |
| PIN | A 6-digit code needed to connect from other devices. Click the copy button to copy it, or click Regenerate to create a new one (this disconnects all active sessions) |
| Copy Link with PIN | Copies the full connection URL including the PIN, ready to be shared via AirDrop, Messages, or any other channel |
| QR Code | Scan this from a phone or tablet camera to instantly connect. The QR code encodes the address and PIN together |
| Connected clients | Shows how many devices are currently connected |
| Stop | Shuts down the server and disconnects all clients |
Connecting from a Device
There are three ways to connect to Replica Link from another device:
Option 1: Scan the QR Code (Recommended)
Point your phone camera at the QR code in the Link panel. Tap the notification that appears — the browser opens and you're automatically authenticated. No PIN entry needed.
Option 2: Use the Shared Link
Click Copy Link with PIN in the Link panel and send the link to any device (e.g. via AirDrop or Messages). Opening the link automatically connects to Replica.
Option 3: Manual Connection
- Open a browser on any device connected to the same network
- Type the Server Address shown in the Link panel (e.g.
http://192.168.1.45:8247) - Enter the 6-digit PIN shown in the Link panel
- Tap Connect
The PIN input supports paste — you can copy the PIN from the Mac and paste it on your phone.
The Web Interface
Once connected, you see the Replica Link web interface. It's designed to be mobile-friendly and works on any screen size.
The top bar shows the Replica Link logo and a Disconnect button. You can also switch between light and dark theme using the theme toggle.
Projects List
The main screen shows all projects currently loaded in Replica as cards. Each card displays:
- Project name
- Image count
- Status badge —
ready,queued,processing,completed, orfailed - Detail level used for the computation
- Progress bar and current stage (when processing)
- Error message (when failed)
Tap any project card to open its detail page.
If no projects exist yet, a prompt invites you to upload photos.
Creating a New Project
Tap New Project in the top right of the projects list.
- Enter a project name — this will also be the folder name on disk
- Add images — either drag and drop files onto the upload area, or tap to browse your device's photo library
- Tap Upload & Create
A progress indicator shows while images are being transferred to the Mac. Once the upload completes, you're automatically redirected to the project detail page.
Supported image formats: JPEG, PNG, HEIF, RAW, TIFF
Project Detail
The project detail page is the main workspace for each project. What's displayed depends on the project status:
When the Project Is Ready
- Project name with a rename button (pencil icon)
- Status badge
- Computation controls (quality level selector and Start button)
- Image grid showing thumbnails of all uploaded images
When the Project Is Processing
- Progress bar with percentage and current processing stage (e.g. "Mesh Generation", "Texturing")
- Cancel button to abort the computation
- The image grid remains visible below
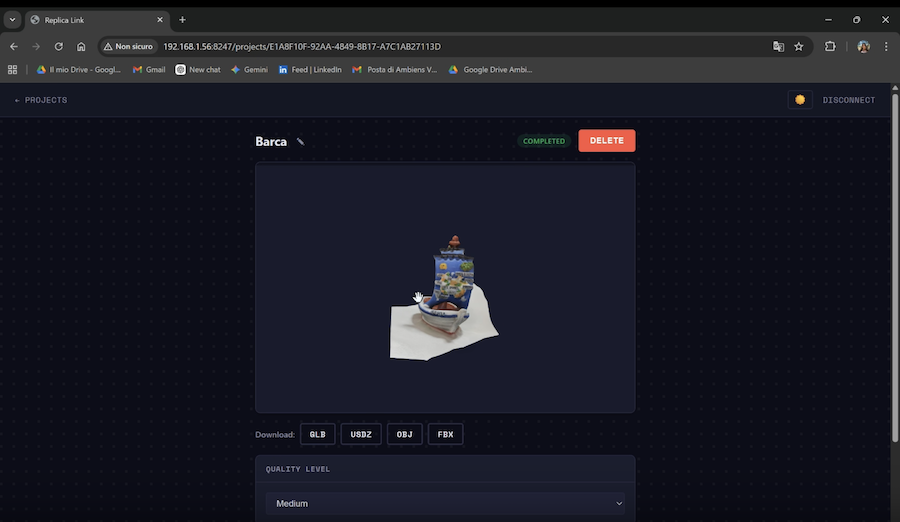
When the Project Is Completed
- Interactive 3D model viewer — the model is displayed at the top of the page. You can rotate, zoom, and pan using touch gestures or mouse controls
- Download bar with format buttons (GLB, USDZ, OBJ, FBX, STL)
- Computation controls — you can run the computation again with different settings
- Image grid (collapsed by default, click "Show" to expand)
When the Project Has Failed
- Error banner showing what went wrong
- Computation controls to retry with different settings
Starting a Computation
The computation controls are visible whenever the project status is ready, completed, or failed.
Quality Level
Select the detail level for the reconstruction:
| Level | Description |
|---|---|
| Preview | Fastest processing, lower quality. Good for quick previews |
| Reduced | Reduced polygon count and texture resolution |
| Medium | Balanced quality and processing time. Recommended for most use cases |
| Full | High quality reconstruction with dense mesh |
| Raw | Maximum quality, longest processing time |
| Custom | Full control over polygon count, texture size, format, and texture maps |
Mesh Options
Click Mesh Options to expand additional settings:
| Option | Values | Description |
|---|---|---|
| Sample Ordering | Unordered / Sequential | Set to Sequential if photos were taken in order (e.g. walking around an object) |
| Feature Sensitivity | Normal / High | High sensitivity detects more features, useful for textureless surfaces |
| Mesh Primitive | Quad / Triangle | Quad meshes are better for sculpting, triangles for real-time rendering |
| Object Masking | On / Off | Automatically isolates the main object from the background |
Custom Detail Settings
When Custom is selected as the quality level, additional options appear:
| Option | Description |
|---|---|
| Max Polygon Count | Maximum number of polygons in the output mesh |
| Max Texture Size | Texture resolution: 1K, 2K, 4K, 8K, or 16K |
| Texture Format | PNG (lossless) or JPEG (smaller file size) |
| JPEG Quality | Compression quality slider (only when JPEG is selected) |
| Output Texture Maps | Select which texture maps to generate: All, or individual maps (Ambient Occlusion, Diffuse Color, Displacement, Normal, Roughness) |
After configuring the settings, tap Start Computation. The project status changes to queued and then processing as the Mac begins reconstruction.
Viewing the 3D Model
Once the computation is complete, an interactive 3D model viewer appears at the top of the project detail page.
Controls:
- Rotate — drag with one finger (mobile) or left-click drag (desktop)
- Zoom — pinch (mobile) or scroll wheel (desktop)
- Pan — drag with two fingers (mobile) or right-click drag (desktop)
- Auto-rotate — the model slowly rotates by default
The model viewer uses the GLB format, which is automatically generated when a computation is started from Replica Link.
Tip: On iOS Safari, the AR button opens the model in augmented reality using AR Quick Look — you can place the 3D model in your real environment.
Downloading the Model
When a model is available, a download bar appears below the 3D viewer with buttons for each format:
| Format | Description |
|---|---|
| GLB | Universal 3D format. Compatible with most 3D tools and the web. Single file with embedded textures |
| USDZ | Apple's 3D format. Native to macOS/iOS, ideal for AR Quick Look and Apple ecosystem |
| OBJ | Classic format, widely supported. Generated on demand |
| FBX | Autodesk format, common in game engines and animation tools. Generated on demand |
| STL | Common format for 3D printing. Mesh only, no textures. Generated on demand |
Tap a format button to start the download. For GLB and USDZ, the download is instant. For OBJ, FBX, and STL, the Mac converts the model on demand — the button shows "Preparing..." while the conversion runs. Converted files are cached, so subsequent downloads of the same format are instant.
You can also download all project images as a ZIP archive by expanding the image grid and tapping Download All.
Managing Projects
Renaming a Project
On the project detail page, tap the pencil icon next to the project name. Type the new name and press Enter or tap Save. This renames both the project and its folder on disk.
Restrictions:
- Name cannot be empty
- Name cannot contain
/or\ - Cannot rename a project while it's processing
Deleting a Project
Tap the red Delete button on the project detail page. A confirmation dialog appears with an option to also delete files from disk. If unchecked, the project is removed from Replica but the files remain on the Mac.
Supported Formats
Input Images
| Format | Extension |
|---|---|
| JPEG | .jpg, .jpeg |
| PNG | .png |
| HEIF | .heif, .heifs |
| RAW | .raw |
| TIFF | .tif, .tiff |
Output Models
| Format | Extension | Notes |
|---|---|---|
| GLB | .glb |
Auto-generated, used by 3D viewer |
| USDZ | .usdz |
Native output, always available |
| OBJ | .obj |
Generated on demand |
| FBX | .fbx |
Generated on demand |
| STL | .stl |
Generated on demand |
Security & Privacy
Replica Link is designed for local network use only:
- No internet required — everything happens on your local network
- PIN-protected — a random 6-digit PIN is generated each time the server starts. No one can access the web interface without it
- Session tokens — after entering the PIN, a session token is issued that expires after 24 hours
- Regenerable PIN — click Regenerate in the Link panel to create a new PIN. This immediately invalidates all active sessions
- No external services — no data is sent to any cloud server. All processing happens locally on your Mac
Note: The connection uses HTTP (not HTTPS) since it's local-network only. Avoid using Replica Link on public or untrusted networks.
Troubleshooting
"Unable to connect" when entering the address
- Make sure both devices are on the same Wi-Fi network
- Check that the server is running (green indicator in the Link panel)
- Try the full address including
http://and the port number - If the Mac has a firewall enabled, allow incoming connections for Replica when prompted
QR code doesn't work
- Make sure your phone camera can scan QR codes (most modern phones do this natively)
- Ensure you're scanning in a well-lit environment
- Try using the Copy Link with PIN button instead and send the link to your phone
"Invalid PIN" error
- Check that you're entering the PIN currently shown in the Link panel (not an old one)
- If the PIN was regenerated, previous sessions are invalidated — enter the new PIN
- The PIN is 6 digits, numbers only
Upload fails
- Ensure the upload folder is configured (check the Link panel — it should not say "Not configured")
- Verify that the Mac has enough disk space
- Check that the image format is supported (JPEG, PNG, HEIF, RAW, TIFF)
Model viewer shows a blank area
- Wait a few seconds — the GLB model may still be generating after the computation completes. A "Preparing 3D model..." spinner is shown during this time
- Try refreshing the page
Download shows "Preparing..." for a long time
- OBJ, FBX, and STL formats require conversion via Blender. This may take 30 seconds to a few minutes depending on the model size
- The file is cached after the first conversion, so subsequent downloads are instant
Server won't start
- If the default port (8247) is in use, Replica automatically tries the next available port (8248, 8249, etc.)
- If no local network IP is found, check that your Mac is connected to a network
- macOS may show a firewall dialog the first time — click Allow
Session expired
- Sessions expire after 24 hours. Simply enter the PIN again to reconnect
- If the PIN was regenerated, all previous sessions are invalidated