Workflows (Pro Feature) 🌟
Workflows are automated operation sequences that streamline your photogrammetry pipeline. Create custom operations that automatically process your 3D models after reconstruction—from scaling and alignment to export—saving time and ensuring consistency across projects.
Note: Workflows are available exclusively for Pro users.
Important: For workflows to function properly, especially the "Export Model" operation for OBJ, FBX, and GLB formats, you must have Blender installed and its path configured in the application settings. See the Getting Started guide for setup instructions.
What Are Workflows?
Think of workflows as your personal assistant for repetitive tasks. Instead of manually scaling, rotating, and exporting each model, create a workflow once and apply it automatically. Each workflow consists of one or more operations that execute in sequence after your photogrammetry session completes.
Important: Workflows must be configured before starting a session. The workflow operations will be applied to the next session you launch.
Common workflow examples:
- Scale model to real-world dimensions → Export as GLB
- Align to reference cameras → Apply ground offset → Export for AR
- Scale by camera distance → Rotate to correct orientation → Export as FBX
Accessing the Workflow Tab
Navigate to the Workflow tab to access workflow operations.

Available Operations
Replica offers six powerful operations you can combine into custom workflows:
1. Scale to Target Bounding Box
Automatically scale your 3D model to match specific real-world dimensions.
How it works:
- Set target dimensions for X, Y, and Z axes (in meters)
- Use
0on any axis to ignore that dimension - Model scales proportionally to match your target
Configuration options:
- X, Y, Z dimensions (in meters)
Example use cases:
- Scale a scanned object to its known height (e.g., Y = 1.7 meters)
- Ensure models fit within specific size constraints
- Create models at consistent scales for comparison
Tip: If you only know one dimension, set the others to 0. For example, set Y = 1.7 and X = 0, Z = 0 to scale the model to 1.7 meters tall.
2. Scale by Camera Distance
Scale your model based on known distances between camera positions. Perfect when you have reference measurements from your capture session.
How it works:
- Identify camera pairs by their image file name suffix (e.g.,
_101,_102) - Provide the real-world distance between each pair
- Replica calculates the average scale factor from all pairs
Configuration options:
- Camera Pairs: Format
_101,_102;_201,_202(semicolon separates pairs) - Real Distances: Format
1.0;2.3(in meters, matching pair order)
Example:
Camera Pairs: _101,_102;_201,_202
Real Distances: 1.0;2.5

This tells Replica:
- Distance between camera _101 and _102 is 1.0 meter
- Distance between camera _201 and _202 is 2.5 metersNote: More camera pairs provide more accurate scaling through averaging.
3. Apply Y Offset
Move your model vertically to align it with a reference plane, such as ground level.
How it works:
- Apply a vertical translation along the Y axis
- Positive values raise the model, negative values lower it
- Useful for aligning models to ground or reference surfaces
Configuration options:
- Y Offset (in meters)
Example use cases:
- Lower a model by 0.5m to align the bottom with ground level
- Raise a model by 1.0m to position it on a virtual pedestal
- Adjust vertical position to match other models in a scene
Tip: Use this after scaling to position your model at the correct height relative to a reference plane.
4. Align to Cameras
Rotate both the model and imported cameras to align a specific model axis to a line defined by selected camera positions.
How it works:
- Identify cameras by their image file name suffix (e.g.,
_101,_201,_301) - Select which world axis to use as the rotation reference
- Choose which model axis should align with the camera line
- Both the model and all cameras rotate together, maintaining their relative positions
Configuration options:
- Camera IDs: Comma-separated list identifying cameras in photo names (e.g.,
_101,_201,_301) - Rotation Axis: Reference world axis for the rotation (X, Y, or Z)
- Target Axis: Which model axis to align with the camera line (+X, -X, +Y, -Y, +Z, -Z)
- Angle Offset: Additional rotation in degrees for fine-tuning
Swift/SceneKit coordinate system:
- Y axis is vertical (up)
- Z axis is depth/forward-back
- X axis is horizontal/left-right
Example:
Camera IDs: _101,_201,_301
Rotation Axis: Z
Target Axis: -Y
Angle Offset: 0

This rotates the model and cameras so that the model's -Y axis
aligns with the line defined by cameras _101, _201, and _301,
using the Z axis as the rotation reference.Important: This operation rotates both the model and all imported cameras together. The cameras maintain their positions relative to the model, which is useful for preserving the photogrammetry context while correcting orientation.
5. Export Model
Automatically export your processed model in your preferred format.
How it works:
- Choose an export format
- Select a destination folder
- Model exports automatically after all previous operations complete
- Export folder opens when done
Configuration options:
- Export Format: GLB, OBJ, FBX, or AR (GLB + USDZ)
- Export Folder: Where to save the exported file
Supported formats:
- GLB: Web-optimized, perfect for Three.js and web viewers
- OBJ: Universal format, widely supported
- FBX: Animation-ready, ideal for game engines (Unity, Unreal)
- AR: Both GLB and USDZ for comprehensive AR support
Important: The exported file includes all transformations from previous operations in your workflow sequence.
6. Delete Project
Automatically remove the project and free up memory after processing completes.
How it works:
- Deletes all project data
- Frees up memory resources
- Cannot be undone
Configuration options:
- None (operation executes when reached in workflow)
Use cases:
- Batch processing multiple projects
- Automated pipelines where projects don't need to be retained
- Memory management for large datasets
Warning: This operation is permanent. Ensure you've exported everything you need before including this operation.
Creating Your First Workflow
Let's create a simple workflow that scales and exports a model.
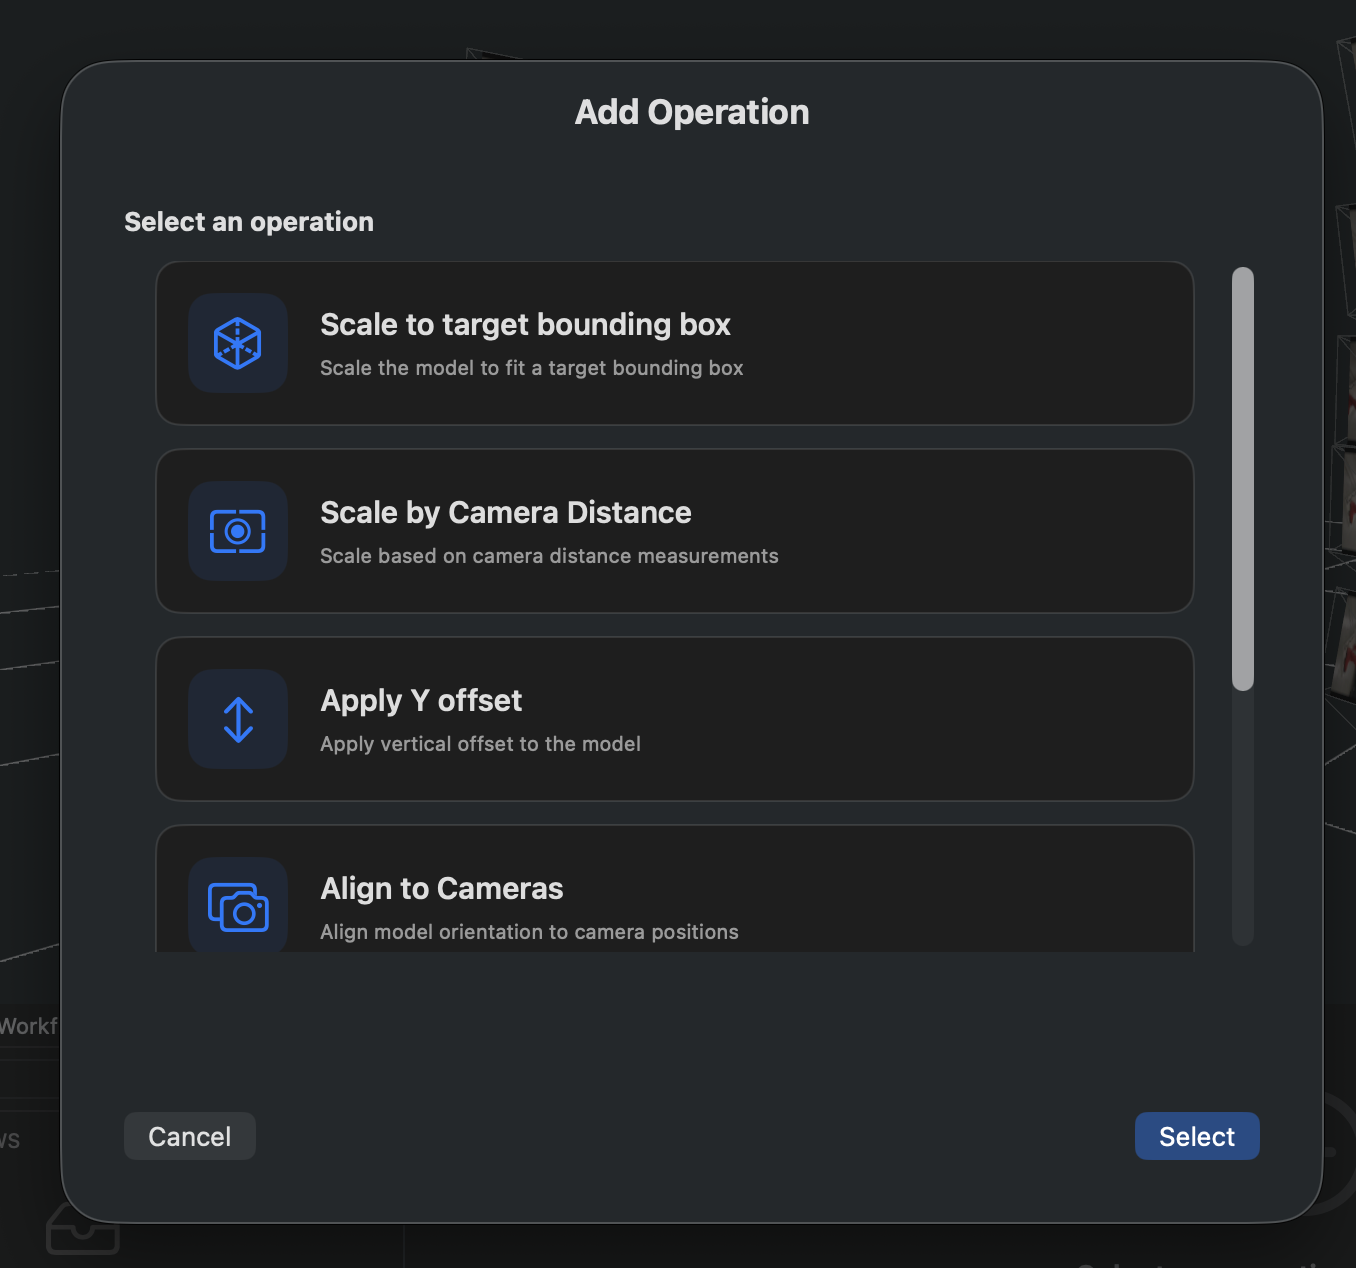
Step 1: Add an Operation
Click the ADD OPERATION button in the workflow panel.
Step 2: Select Operation Type
Choose from the available operations. We'll start with "Scale to target bounding box."
Step 3: Configure the Operation
Set your parameters. For example, to scale a model to 1.7 meters tall:
- X: 0
- Y: 1.7
- Z: 0

Step 4: Add More Operations (Optional)
Click ADD OPERATION again to add additional steps. For example, add "Export model" to automatically save your scaled model.
Step 5: Save and Start Your Next Session
Once you've configured your workflow operations, they will be saved and applied automatically to the next photogrammetry session you start. The operations execute after reconstruction completes.
Remember: Always configure your workflow before starting the session you want it to apply to.
Managing Operations
Reordering Operations
Operations execute in the order they appear. To change the order:
- Select an operation from the list
- Click the up arrow to move it earlier
- Click the down arrow to move it later
Order matters! For example:
- Correct: Scale → Rotate → Export
- Incorrect: Export → Scale → Rotate (export happens before transformations)
Editing Operations
- Select an operation from the list
- Modify its settings in the configuration panel
- Changes save automatically
Deleting Operations
To remove an operation:
- Select it from the list
- Click the trash icon
- The operation is removed and any applied transformations are reset
Note: Deleting an operation resets only its specific transformation, leaving other operations intact.
Workflow Best Practices
Planning Your Workflow
Think about operation order:
- Scale operations first - Establish correct dimensions
- Alignment operations second - Position and orient correctly
- Offset adjustments third - Fine-tune positioning
- Export operations last - Save the final result
- Delete project (if needed) - Clean up after everything is done
Common Workflow Patterns
Product Photography Pipeline:
1. Scale to Target Bounding Box (Y = known height)
2. Apply Y Offset (align to ground)
3. Export Model (GLB for web)
Architectural Documentation:
1. Scale by Camera Distance (using reference measurements)
2. Align to Cameras (correct orientation)
3. Export Model (OBJ for CAD software)
AR Application Content:
1. Scale to Target Bounding Box (appropriate size for AR)
2. Align to Cameras (correct facing direction)
3. Apply Y Offset (ground alignment)
4. Export Model (AR format: GLB + USDZ)
Batch Processing:
1. Scale to Target Bounding Box
2. Export Model (save results)
3. Delete Project (free memory for next project)
Calibration Tips
For Scale by Camera Distance:
- Use camera pairs that are far apart for better accuracy
- Measure distances precisely during your photo session
- Include multiple pairs to improve accuracy through averaging
- Mark camera positions during capture for easy identification
For Align to Cameras:
- Choose cameras that clearly define a line in your desired orientation direction
- Use cameras distributed along the intended alignment axis
- Remember that both model and cameras rotate together
- Consider your coordinate system when selecting rotation and target axes
- Test with different angle offsets to fine-tune the alignment
Testing Workflows
Start simple:
- Create a workflow with just one operation
- Verify it works as expected
- Add operations one at a time
- Test after each addition
Verify transformations:
- Check the viewer after each operation
- Ensure scales are correct (compare to known dimensions)
- Verify alignment matches your expectations
- Test exports open correctly in target applications
Troubleshooting
Operation doesn't apply:
- Verify all required fields are filled
- Check that values are in the correct format
- Ensure operation order is logical
- Try running operations individually to isolate issues
Scale seems incorrect:
- For bounding box: Verify you set the right axis (X, Y, or Z)
- For camera distance: Check camera ID format includes underscore (e.g.,
_101) - Verify real-world measurements are accurate
- Check that distance values match the pair order
Model doesn't align correctly:
- Verify camera IDs match your image file names exactly
- Check that you have at least 2-3 cameras in your list for a clear alignment line
- Try different combinations of rotation axis and target axis
- Adjust angle offset in small increments (try ±90°, ±180°)
- Remember that this rotates both model AND cameras together
- Verify the cameras you selected actually define the direction you want
Export fails:
- Verify export folder is accessible and has write permissions
- Check that disk space is available
- Ensure Blender is configured (for OBJ, FBX formats)
- Try exporting manually first to verify setup
Performance Considerations
Memory usage:
- Each operation processes the full model in memory
- Complex workflows may require more RAM
- Consider model size when designing long workflows
Processing time:
- Each operation adds processing time
- Scale and offset operations are fast
- Alignment calculations take longer
- Exports depend on format and model complexity
Optimization tips:
- Combine related operations when possible
- Remove unused operations
- Test workflows on smaller models first
- Monitor system resources during processing
Next Steps
Now that you understand workflows:
-
Getting Started - Learn the basics of creating photogrammetry projects
-
Session Configuration - Master all configuration options for optimal results
-
Refine Operations (Pro) - Apply precise georeferencing transformations using GPS metadata from drone images
Need Help?
Visit the Replica community forums for support, workflow examples, and tips from other Pro users.
Happy automating! 🚀